Home
1. 项目介绍
tangyuan-timer是tangyuan框架中的定时程序组件,基于quartz框架,提供定时程序的功能。
什么是定时程序呢?其实定时程序就是定时器+程序;这里的程序指的是tangyuan中的服务,也就是我的业务逻辑实现,而定时器呢?则是我们tangyuan-timer组建所提供的功能;
2. 版本与maven使用
当前最新版本:1.2.0
maven中使用
<dependency>
    <groupId>org.xson</groupId>
    <artifactId>tangyuan-timer</artifactId>
    <version>1.2.0</version>
</dependency>
3. 使用场景
假设有这样一个需求,用户在线每超过一个小时,赠送10积分;
对于这个需求,使用定时程序来处理就非常合适。我们可以编写一个定时程序, 每隔5分钟(假设这么设置是合理的)执行一次,定时程序中服务的逻辑是:首先判断用户是否在线,如果用户在线,则计算用户在线的时间是否满足赠送积分的要求,满足则赠送积分,并记录相关时间;通过这个定时程序我们就可以实现上述的需求;当然我们也可以进一步的细分;我们可以把上面的这个定时程序拆分成两个定时程序,一个处理用户的在线情况,另一个则用来处理用户积分的赠送;
对于一些复杂的业务,我们可以通过定时程序的方式,将其进行细化和拆分,以达到解耦合的效果;
4. 使用教程
首先我们需要编写一个服务demo/sendPointsOnline来实现上述需求;具体服务的编写可参考tangyuan框架其他章节http://xson.org/project/tangyuan/1.2.0,接下来是定时器部分的使用和配置了;
a. 增加依赖的Jar
<dependency>
   <groupId>org.xson</groupId>
   <artifactId>tangyuan-timer</artifactId>
   <version>1.2.0</version>
</dependency>

<dependency>
    <groupId>org.quartz-scheduler</groupId>
    <artifactId>quartz</artifactId>
    <version>2.2.2</version>
    <exclusions>
       <exclusion>
         <groupId>c3p0</groupId>
         <artifactId>c3p0</artifactId>
       </exclusion>
       <exclusion>
         <groupId>org.slf4j</groupId>
         <artifactId>slf4j-api</artifactId>
       </exclusion>
    </exclusions>
</dependency>
b. 在tangyuan总配置文件(tangyuan.xml)添加timer组件
<?xml version="1.0" encoding="UTF-8"?>
<tangyuan-component xmlns:xsi="http://www.w3.org/2001/XMLSchema-instance"
    xsi:noNamespaceSchemaLocation="http://xson.org/schema/tangyuan/component.xsd">

    <component resource="component-sql.xml" type="sql" />
    <!--添加timer组件-->
    <component resource="component-timer.xml" type="timer" />

</tangyuan-component>
c. 配置定时器(component-timer.xml)
<?xml version="1.0" encoding="UTF-8"?>
<timer-component xmlns:xsi="http://www.w3.org/2001/XMLSchema-instance"
    xsi:noNamespaceSchemaLocation="http://xson.org/schema/tangyuan/timer/component.xsd">

    <!-- 在线送积分 -->
    <timer scheduled="0 0/5 * * * ?" service="demo/sendPointsOnline" desc="在线送积分" sync="true"/>

</timer-component>
通过上述3个步骤,我们就定义了好了这个定时程序,每隔5分钟执行一次demo/sendPointsOnline服务,也就是我们的在线送积分服务;
5. 定时器
定时器是通过component-timer.xml中的timer节点来配置的,timer节点的具体属性如下:
| 属性 | 用途 | 必填 | 取值 | 默认值 |
|---|---|---|---|---|
| scheduled | 执行计划 | Y | quartz的cron表达式,详见http://www.quartz-scheduler.org/ | |
| service | 服务名 | custom属性为空时此项必填 | 需要满足tangyuan服务名称规范 | |
| sync | 是否同步访问;同步访问意味着不允许并发访问 | N | true和false | true |
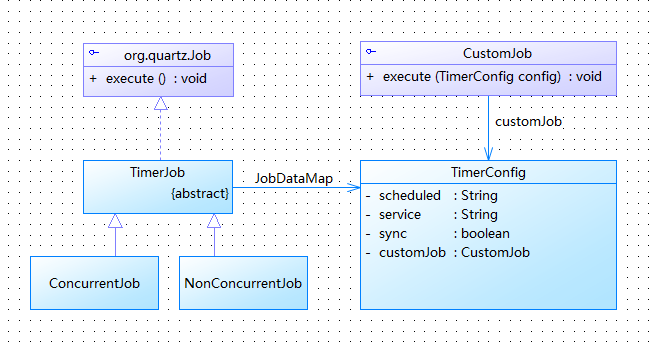
| custom | 自定义定时器全类名 | N | String | |
| desc | 定时器用途描述 | N | String |
tangyuan-timer组件中的定时器分为两种,一种是组件自身实现的,另一种是用户自定义的;上面在线送积分示例中使用的定时器就是组件自身的,无需开发人员编写任何代码;如果需要使用用户自定义的定时器,可通过下面步骤实现:
1.编写自定义的定时器实现类
public class MyJob implements CustomJob {

    @Override
    public void execute(TimerConfig config) {
       XCO result = ServiceActuator.execute("demo/getUserList", new XCO());
       List<XCO> userList = result.getXCOListValue("userList");
       for (XCO user : user) {
         ServiceActuator.execute("demo/sendPointsOnline", user);
       }
    }

}
注意 自定义的定时器必须实现org.xson.tangyuan.timer.CustomJob
2.配置自定义定时器(component-timer.xml)
    <!-- 在线送积分 -->
    <timer scheduled="0 0/5 * * * ?" desc="在线送积分" sync="true" custom="org.xson.demo.MyJob"/>
6. 如何部署
定时程序的部署可以分为两种方式,一种是和服务整合在一起,作为一套系统部署;另一种是独立部署;
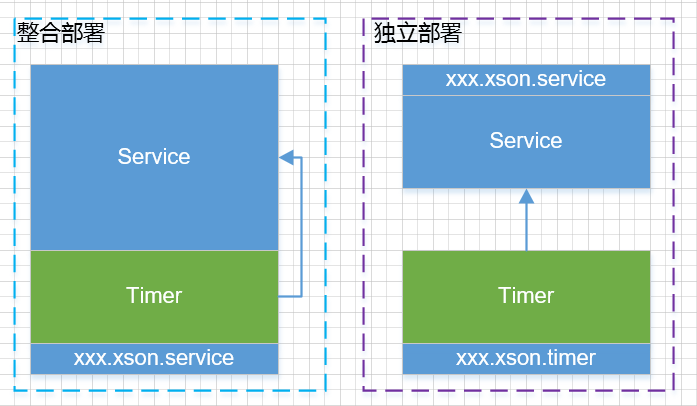
在上述使用教程中示例中<timer scheduled="0 0/5 * * * ?" service="demo/sendPointsOnline" desc="在线送积分" sync="true"/>使用就是整合部署,如果使用独立部署的应该做如下调整:
1.新建一套系统(xxx.xson.timer),只用作与定时程序;
2.该系统增加tangyuan-rpc组件,详见http://xson.org/project/rpc/1.2.0/
3.修改component-timer.xml配置文件如下:
<!-- 在线送积分 -->
<timer scheduled="0 0/5 * * * ?" service="xxx.xson.service/demo/sendPointsOnline" desc="在线送积分" sync="true"/>